Adobe Illustrator: How to Change PPI in an Existing Document.
Beyond Vectors: How to Change PPI (Resolution) in Adobe Illustrator. Adobe Illustrator... The fortress of vector-based graphic design, the temple of scalability and infinite resolution. When starting a project, you've spent hours…
Beyond Vectors: How to Change PPI (Resolution) in Adobe Illustrator. Adobe Illustrator... The fortress of vector-based graphic design, the temple of scalability and infinite resolution. When starting a project, you've spent hours…
Adobe Illustrator: How to Change PPI in an Existing Document — post content
Beyond the Vector: How to Change PPI (Resolution) in Adobe Illustrator
Adobe Illustrator... The fortress of vector-based graphic design, the temple of scalability and infinite resolution. You've spent hours starting your project: drawn fine details, perfectly placed your artboards, and created those flawless vector lines. Now, before exporting your work to a raster-based format (JPEG, PNG, etc.), you turn on "Pixel Preview" mode for one final check, and at that moment you face the dreadful reality: The resolution looks completely wrong! The edges are blurry, the details are lost, and all your effort seems about to go to waste. There's only one reason for this: Your document's PPI (Pixels Per Inch) setting was set incorrectly.
At this point, I can almost hear the voice of a strict vector advocate: "But what does PPI matter in Illustrator? It's a vector program, it works independent of resolution!" In theory, this is absolutely correct. Because vectors are based on mathematical formulas, they can be enlarged and reduced infinitely without quality loss. But practice doesn't always follow theory. At the final moment when our vector designs are to be displayed on digital screens or sent to print, we have to step into the world of pixels. And right there, the PPI setting becomes one of the most critical factors determining the fate of your work.
Maybe you're designing "pixel-perfect" icons that will look flawless across various platforms with different screen densities. Or maybe the vector plans you prepared at a specific scale need to be converted into a raster image with the right resolution to show enough detail, to be used as a background guide in a 3D modeling program. In situations like these, being able to change your document's PPI setting afterward is vital. So how can you do this most effectively and with the least headache? In this comprehensive guide, we will go through, step by step, the slow, the difficult, and ultimately the best solutions for changing the PPI of an existing Illustrator document.
Basic Concepts: PPI, DPI, and Why Are They Important?
Before diving into the depths of the topic, let's clarify two concepts that are often confused with each other:
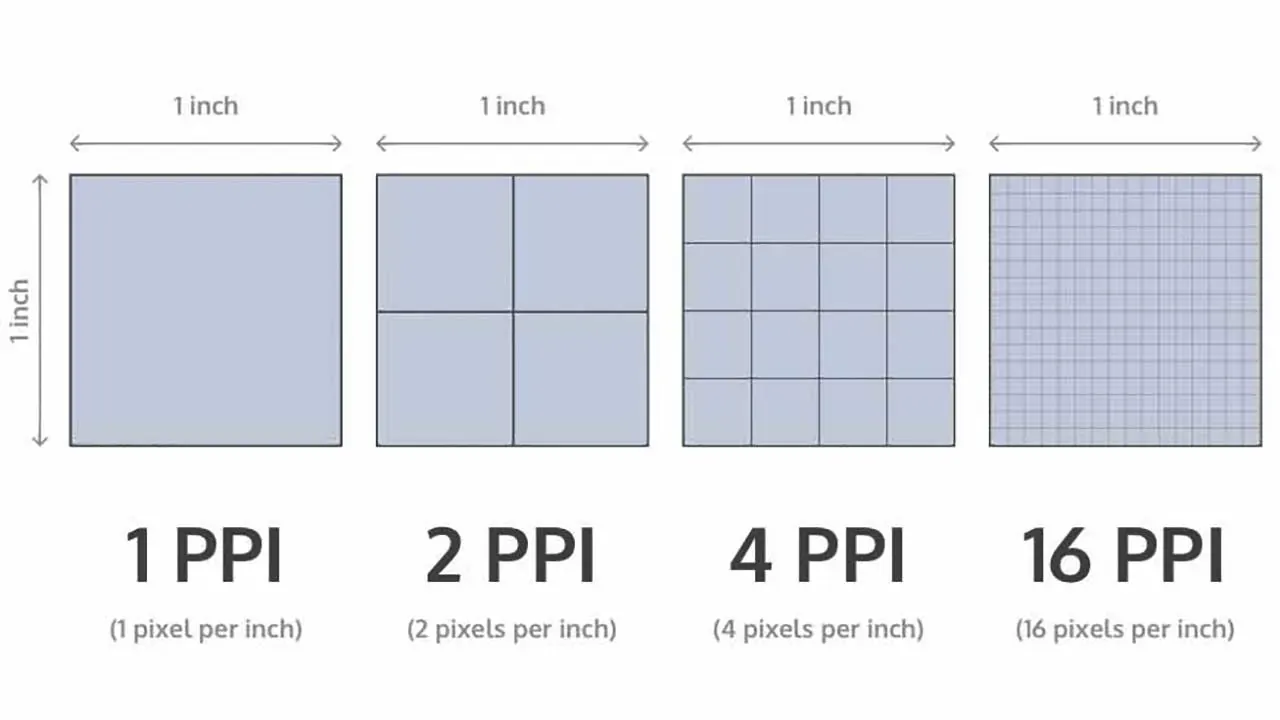
PPI (Pixels Per Inch): This is a unit of measurement used for digital screens. It indicates how many pixels fit into a one-inch area. Higher PPI means a sharper and more detailed image. The standard for web and screen designs is typically 72 PPI.
DPI (Dots Per Inch): This is a term used for printing. It expresses how many ink dots a printer can place in a one-inch area. For high-quality print, 300 DPI is generally accepted as the standard.
Although Adobe Illustrator sometimes uses these two terms interchangeably, what appears in the program as the "Raster Effects" setting is actually PPI, and this setting determines the quality of the document's raster-based effects (shadows, glows, etc.) and, most importantly, the "Pixel Preview" mode.
The fact that different devices have different PPI values requires us to think about how our designs will look on various screens.
The fundamental scenario in which the PPI setting matters in Illustrator is, before exporting your vector work to a raster format (JPEG, PNG, TIFF), being able to accurately preview how it will look once converted to pixels. If you're working on a 72 PPI document but expecting a 300 PPI output, the Pixel Preview mode will mislead you and the results won't be as expected.
Method 1: The Slow and Tedious Solution - Creating a "New Document"
The first and most obvious solution that comes to mind for this problem is to create a completely new Illustrator document.
Go to the File > New menu.
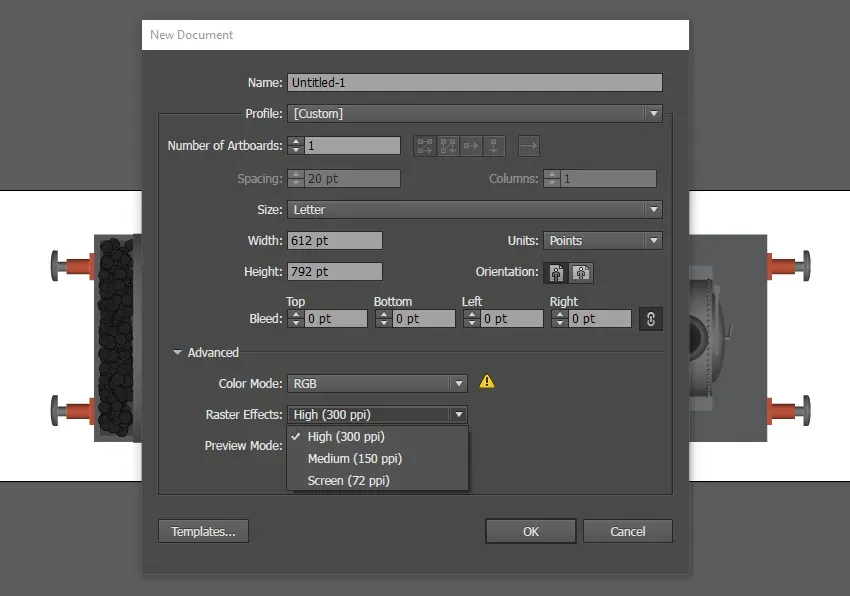
In the "New Document" window that opens, expand the Advanced Options section on the right.
Here, select your desired resolution from the "Raster Effects" dropdown menu (Screen (72 ppi), Medium (150 ppi), or High (300 ppi)).
Create the new document.
What you need to do after this step is what explains why we call this method "slow and tedious": You'll have to select and copy all the drawings in your old document, paste them into the new document, set up your artboards from scratch, and likely rescale all elements according to the new size. This may be acceptable for work consisting of only a few simple shapes, but for a complex illustration with layers of detail, it's an absolute nightmare.
It is possible to set the PPI from the very beginning when creating a new document, but for an existing project this is not a practical solution.
What's more, this method limits you to only three standard PPI options (72, 150, 300). If you need a custom resolution like 96 PPI or 200 PPI, you're out of luck with this method. So we need to turn to better alternatives.
Method 2: The Difficult and Misleading Solution - Playing With "Export Settings"
A second approach is to completely ignore the Pixel Preview mode and document settings within Illustrator and only set the resolution at the final stage, namely during export.
Use one of the options File > Export > Export for Screens or Export As.
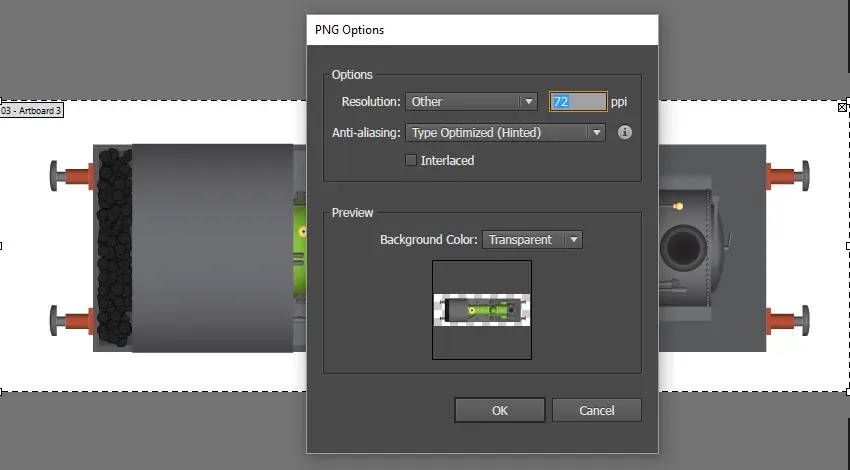
When you choose a raster format such as JPEG or PNG, a settings window appears.
In this window, you can choose your desired PPI value from the "Resolution" section (72, 150, 300, or higher).
It is possible to change the resolution during export, but this is like "flying blind."
Why is this method "difficult and misleading"? Because during this process, you have no way to preview how your work will look in its final form. Especially if you're aiming for "pixel perfection," this approach turns into a complete trial-and-error game. You may need to constantly export with different settings, check the result, return to Illustrator to make fine adjustments, and live through this loop over and over again. This is an inefficient and frustrating process. It completely eliminates the very purpose of Pixel Preview mode.
Method 3: The Best and Most Flexible Solution - "Document Raster Effects" Settings
Here we are, at the most effective, most flexible, and least known method of changing the PPI of an existing document afterward. This solution is hidden a bit deep in Illustrator's menus, and it lets you permanently change the basic raster effect resolution of your document. Thanks to this, all raster-based operations within the program, including the Pixel Preview mode, work according to your new resolution.
The steps to follow are these:
In your document open in Illustrator, go to the Effect menu in the top menu.
From the menu that opens, click on the "Document Raster Effects Settings..." option.
This is where the magic happens! From here you can change the document's basic resolution at any time.
In the window that appears, you'll see the "Resolution" section. Here you can choose one of the standard options (Screen, Medium, High) or check the "Other" option to enter any custom PPI value you want, from 1 to 2400.
After setting the value you want, click the "OK" button.
That's it! Your document's basic PPI setting has now changed. Now when you turn on View > Pixel Preview mode, you can see accurately how your drawings convert into pixels at the new resolution value. This gives you full control and an accurate preview before exporting.
Bonus Tip: "Rasterize Effect" for a Temporary Preview
If you don't want to change the document's basic setting and just want to temporarily see how a particular object will look at a different resolution, you can use the individual "Rasterize Effect."
Select the object or objects you want to preview.
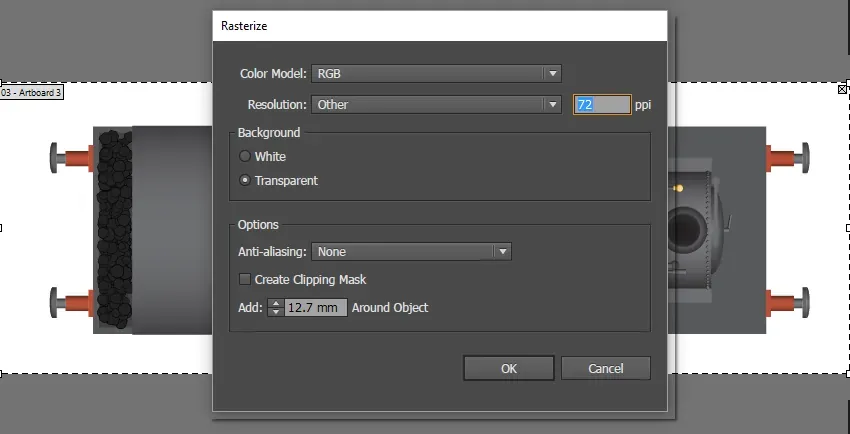
Go to the Effect > Rasterize menu.
From the window that opens, select your desired temporary resolution and click "OK."
This rasterizes only the selected objects and applies it as an effect. You can later turn off, delete, or change the settings of this effect from the Appearance Panel (Window > Appearance). This is a great method for running quick tests without affecting the document's overall setting.
Conclusion: Take Control
The need to change the PPI setting in the middle of a project in Adobe Illustrator can be a frustrating situation that every designer encounters at least once. Instead of the burden of creating a new document or the uncertainty of flying blind with export settings, using "Document Raster Effects Settings" gives you full control and flexibility at every stage of your project. This simple but powerful feature allows you to firmly build the bridge you need between the worlds of vector and pixels. Now you can put an end to resolution crises and focus on your creativity.