Monetize Your WordPress Site: An A-to-Z Guide to Adding Google AdSense — post content
Earn Money from Your WordPress Site: The A to Z Guide to Adding Google AdSense
As a website or blog owner, you may be dreaming of turning the labor and time you've invested into financial gain. Fortunately, one of the most popular, reliable, and easiest ways to do this in the digital world is available: Google AdSense. Thanks to this huge advertising network of Google, you can earn passive income by displaying ads relevant to the content on your site, and turn your website into a real source of revenue.
However, adding AdSense to your WordPress site can be a bit confusing, especially for beginners. Where will you add which code? Where on your site should you display ads? Is automatic ads better, or manual placement? In this comprehensive guide, you will find the answers to all these questions. Guiding you step by step, we will explain in the finest detail the entire process from how to create your Google AdSense account to how to add ads to your WordPress site correctly and securely. If you're ready, let's take the first step on the journey of earning money from your website.
First, What Is Google AdSense and How Does It Work?
Google AdSense is one of the largest advertising networks in the world, managed by Google. It allows website owners (i.e., publishers like you) to earn money by displaying Google ads on their sites. The system's working principle is quite simple and is generally based on the "Cost-Per-Click" (CPC) model. This means you earn money every time a visitor clicks on an ad displayed on your site. In some cases, you can also earn revenue with the "Cost-Per-Mille" (CPM) model, that is, per 1000 impressions of the ad.
The biggest advantage of AdSense is that it incredibly simplifies the process for you. You don't have to find advertisers, negotiate with them, or deal with payment tracking. All you need to do is add a small piece of code to your site. After this code is added, Google's smart "spiders" (bots) crawl your site, understand what your content is about (e.g., recipes, technology news, travel, etc.), and then automatically display the ads most relevant to this content to your visitors. For example, displaying food processor or oven ads on a page where you share a cake recipe.
Google collects the money from advertisers, takes its own management share (usually around 32%), and pays you the remaining 68%. This is a system that allows you to earn revenue effortlessly, with the power of a giant tech company behind you.
Step 1: Creating a Google AdSense Account and Connecting It to WordPress
First and foremost, you need an AdSense account. If you have an existing Google (Gmail) account, this process will go quite quickly.
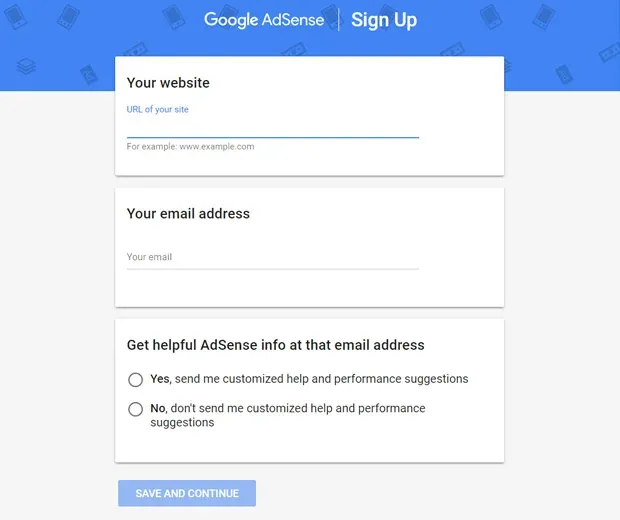
- Go to the Application Page: Go to the Google AdSense official website from your browser and click the "Get Started" button.
- Enter Basic Information: On the screen that appears, enter the URL of your WordPress site that you want to monetize (e.g.,
https://www.yourwebsite.com) and your email address. Optionally, you can specify your email preferences to receive tips and performance recommendations from AdSense. - Accept the Terms and Create the Account: Choose your country and check the box indicating that you have read and accepted the AdSense program's terms of service. Then click the "Create Account" button.

Congratulations! You've created your AdSense account. But the process isn't over yet. Now you need to activate your account. On your AdSense home page, you'll see two important tasks you need to complete:
- Enter Your Payment Information: You need to fill in information such as your name and address completely so that you can receive your payments.
- Connect Your Site to AdSense: This is the most important step for Google to verify that the site really belongs to you and complies with its policies.
How Do You Connect Your Site to AdSense?
AdSense will give you a special code snippet to make this connection. You're asked to place this code between the tags of your WordPress site.

Since playing directly with your theme files can be risky, the safest and easiest way to do this is by using a plugin. Our recommendation is the "WPCode – Insert Headers and Footers" plugin.
- Install and Activate the Plugin: From your WordPress admin panel, go to Plugins > Add New. Type "WPCode" in the search box, find the plugin, and click "Install Now" and then "Activate."
- Paste the Code: When the plugin is activated, go to the Code Snippets > Header & Footer tab in the left menu. Paste the code you copied from AdSense into the box titled "Header."
- Save Changes: Click the "Save Changes" button in the top right corner of the page.

After doing this, return to your AdSense account, check the "I've pasted the code into my site" box, and click the "Done" button. Google will now begin reviewing your site. This review process usually takes 24-48 hours, but in some cases it can take a week or two. It is critical that your site complies with AdSense program policies (having sufficient and original content, not containing illegal activities, etc.) for you to be approved. You'll receive an email when your account is approved.
Step 2: Starting to Display Ads - Two Different Approaches
After your account is approved, you have two main methods for displaying ads on your site: Auto Ads and Manual Ad Units. Both have their advantages and disadvantages.
Method A: Auto Ads (Recommended for Beginners)
Auto Ads is the easiest and most effortless method. When you enable this feature, AdSense's AI analyzes your site and automatically places ads in the locations it thinks will perform best (between posts, sidebar, top of page, etc.) and in the most appropriate sizes. You don't need to deal with ad placement one by one.
Disadvantage: You have less control over where ads will appear, and sometimes it can make placements that may negatively affect the user experience.
How to Enable Auto Ads?
- In your AdSense account, click Ads from the left menu.
- In the Overview tab, click the edit (pencil) icon to the right of the row where your site is listed.
- From the menu that opens on the right, turn on the "Auto ads" option.
- If you wish, you can control the types of ads to be displayed and the ad density on your page with settings such as "Ad formats" and "Ad load."
- Finally, click the "Apply to site" button.
If you've already added the site connection code from Step 1, you don't need to do anything else. AdSense will start displaying ads on your site within about an hour.
Method B: Manual Ad Units (For Those Who Want More Control)
If you want to decide for yourself exactly where on your site and at what size the ads will appear, you should create manual ad units. This method gives you full control.
How to Create and Add a Manual Ad Unit?
- In your AdSense account, go to the Ads > Overview tab and click the "By ad unit" option from the top menu.
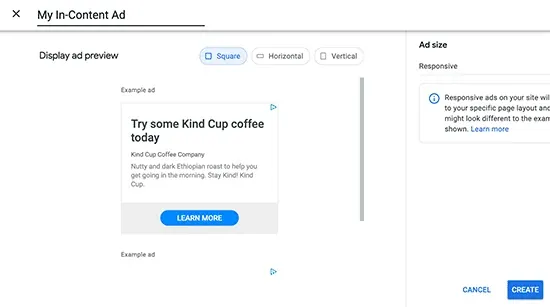
- You'll be presented with various options to create a new ad unit. The most commonly used and most flexible is usually "Display ads". Click this option.
- Configure the Ad Unit:
- Give a name: Give it a name so you can recognize the ad later (e.g., "In-Article 300x250" or "Sidebar Vertical").
- Ad Size: We strongly recommend leaving the "Responsive" option checked. This allows the ad to automatically adapt to all screen sizes (mobile, tablet, desktop).
- Create and Copy the Code: When you click the "Create" button, AdSense will give you a code snippet specific to this ad. Copy this code.


Adding the Manual Ad Code to WordPress (with Widgets)
The most common way to add this code to your site is to use WordPress's "Widgets" feature. This is ideal for placing ads in areas like the sidebar or footer.
- From your WordPress admin panel, go to Appearance > Widgets.
- Find the "Custom HTML" widget from the available widgets list on the left.
- Drag and drop this widget into the area where you want to display the ad (e.g., "Sidebar").
- Paste the ad code you copied from AdSense into the box that opens.
- Click the "Save" button. That's it!

Now when you visit your site, you can see the ad appearing in the area you've designated. Similarly, you can create different ad units and place them in different areas of your site.
Conclusion and Next Steps
Although adding Google AdSense to your WordPress site may seem a bit technical at first, it is a fairly simple process when the right tools and steps are followed. You're now ready to earn passive income from your site. Remember, your AdSense earnings won't skyrocket overnight. This is a process that will increase over time with your site's traffic, the quality of your content, and the optimization of your ad placements. Your next step should be to connect your AdSense account to Google Analytics to analyze which pages and ads are earning you the most, and shape your strategy according to this data. Wishing you abundant earnings!


